|
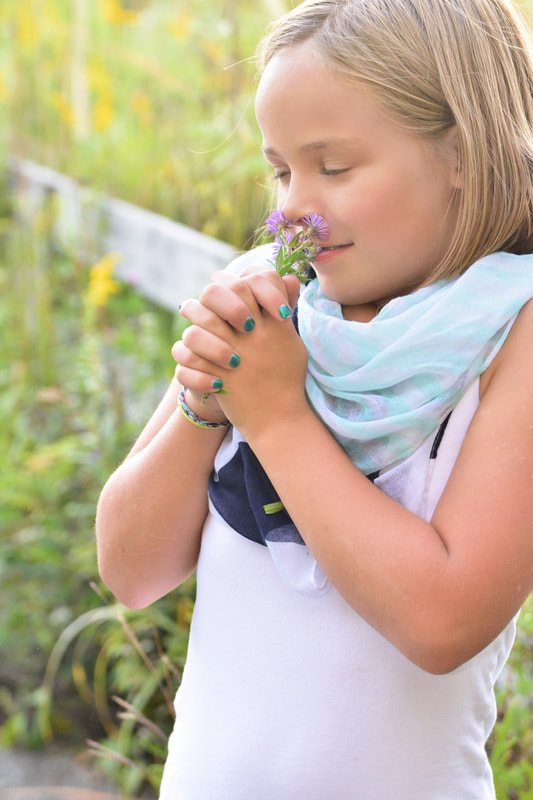
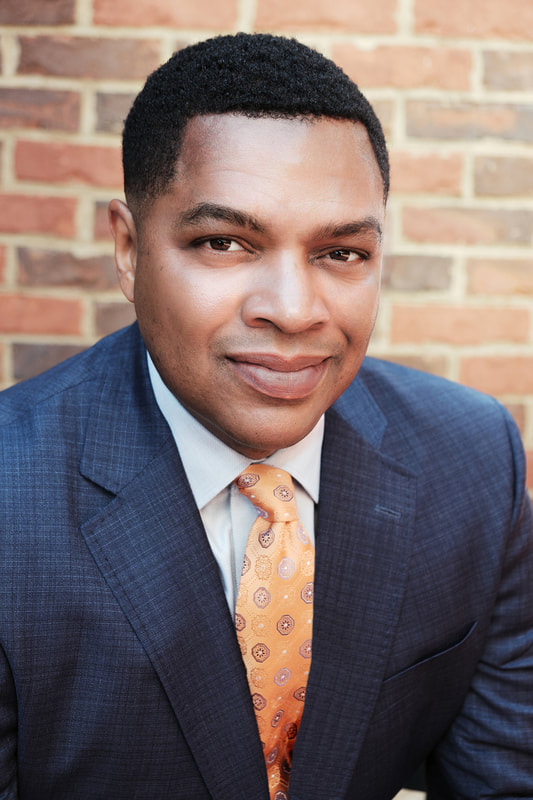
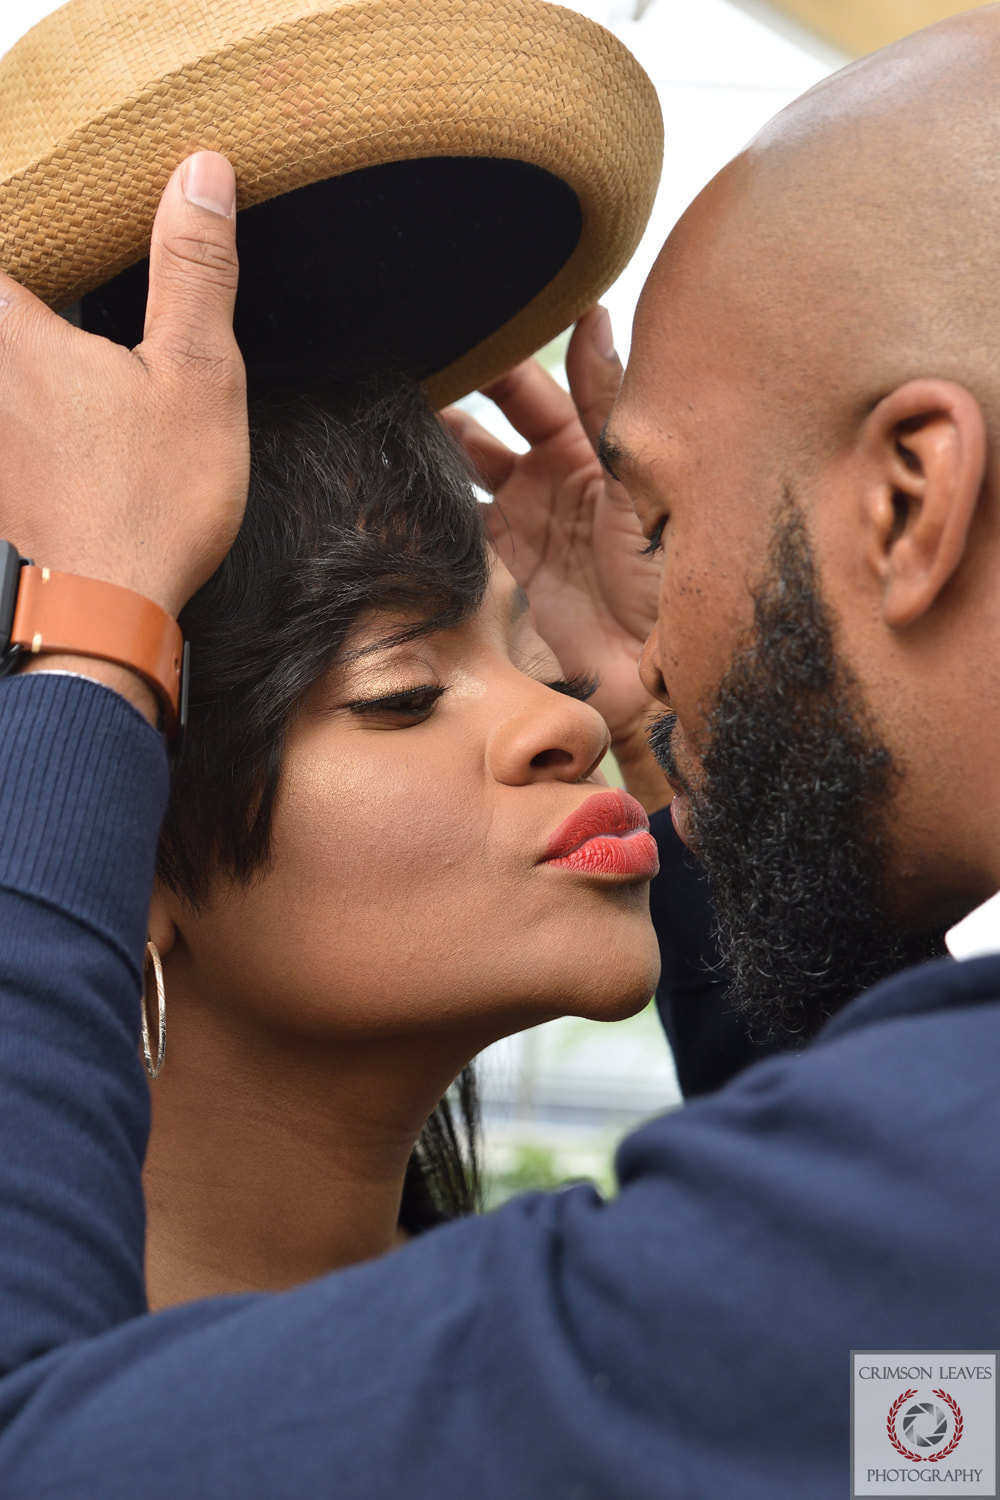
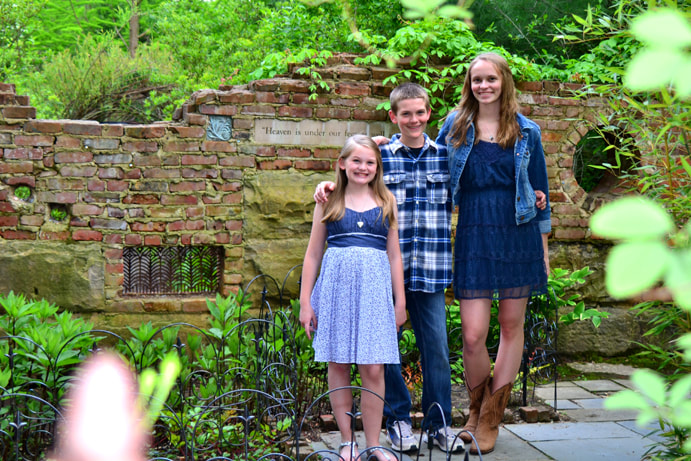
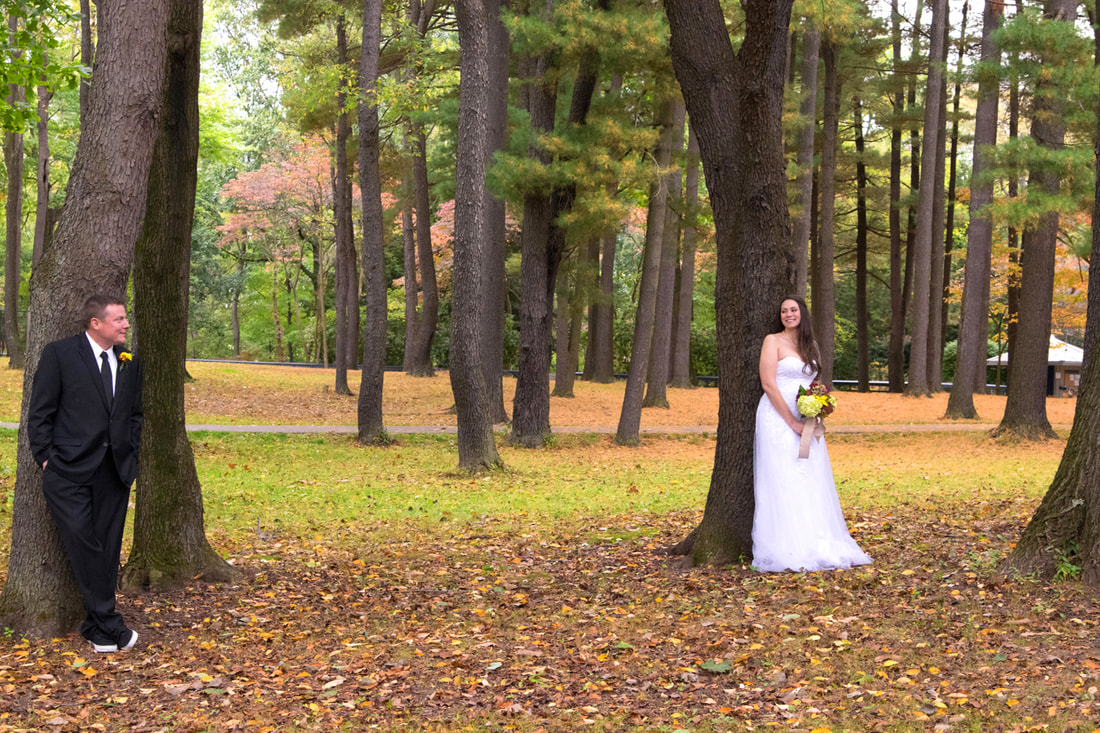
General professional photography portrait tips: * The eyes should be close to where the rule of third lines intersect (not in the very center of the photo) * Find a few interesting / unique perspectives (pretty high or low angle) in addition to your formal shots * When not looking for very unique perspectives, make sure the camera is eye level with your subject (stand on something if they are taller than you or kneel down if they are shorter) * Have a balance of variety (close-up shots, far away shots, unique shots) * Move toward or zoom in VERY CLOSE (the face is most important, it's RECOMMENDED to cut out parts of the head for close-ups and any other distracting objects) * Move or zoom out VERY FAR (this is to show off the background. There should be AT LEAST 1/3rd or more of the background above, below, AND next to the subjects. * Find a path, fence, or lines that go off into the distance for far away shots * Avoid MEDIUM distances from your subjects (2/3rds of the person's body should NOT be showing) Capture full body with plenty of background all around them, or top half of the body at most. * Look around for background colors / textures that you feel go well with the subject * Close-ups usually look best. Even if you think you are close enough, GET A BIT CLOSER * Close-ups can either have no background showing (super close), or 1/3rd background. * For close-ups, avoid having a distracting background (it should complement the person, not pull your attention away from them) * Use aperture F/4 - 5.6 for close-ups (creates bokeh - background blur while keeping the whole face in focus) * Use aperture of F/8 - F/16 for far away shots so most or all of the environment will be in focus Now let's look at where to arrange 1 or more people in a shot. Look at my first photo. This is the farthest away you should take a face portrait. Her body takes of 2/3rds of the shot vertically on the right side. 1/3rd of the shot to her left is the background. Her head is purposely cut off on top and the side to draw your eyes to her face and so the background isn't as distracting. Her eyes are not in the center of the photo which means every part of this photo is following the rule of thirds. Look at the second photo. Again, the man's head is mostly cut off so your eyes will focus on the faces. You can tell he is holding a hat so there is no reason to have the whole hat in the shot. I got close enough so the background is barely seen because this shot was all about their moment, not about the environment they were in. Notice her left eye is not in the very center of the photo, and neither is his. Look at the third photo. This is a super wide angle (far away) shot. The couple is positioned 1/3rd from the right and 2/3rds from the left. The horizon (grass) covers 2/3rds of the photo. The sky covers 1/3rd. The fence goes off into the distance which improves the dramatic effect and creates some perspective of distance. I was actually standing on an electrical box to create a unique perspective / angle. Look at the fourth photo. This is as close as you should get for a wide angle (far away) shot. Their bodies go from the bottom of the shot to about 2/3rds toward the top. They are grouped together about 1/3rd from the right. Look at the fifth photo. This is a business head shot. Notice his eyes are 1/3rd from the top of the photo. I only captured mainly his upper chest and there is not much background. The creates attention to the face.
1 Comment
Lesson 1-2 The very basics of pro photography: Today let's talk about some camera buttons and dials that are important but many people don't use. First off, the EV +/- button or dial. Depending on your camera, there will be a button with (+/-) symbols or a dial that shows 0,-1,-2,-3,+1,+2,+3. This is your EXPOSURE VALUE adjustment. Exposure is a photographer term that means brightness. (+) numbers make the next photo brighter, (-) numbers makes it darker. How great is that! So easy! If someone's face is too dark from the last pic you took, just keep raising the numbers until you get correct exposure. Exposure is adjusted in 1/3rds by all cameras. Example +0.3, +0.7, +1.0, etc... If you use your LCD screen to take pictures instead of a viewfinder, then you can even see the changes in real time before you take the photo which is very helpful! This saves you time from taking a pic, then looking to see if it's too dark or bright. Don't forget to change your settings back to zero once you get the shot you want. Next let's talk about the DRIVE button. The icon for this is usually several boxes overlapping each other on the button. This changes your picture taking mode from a single photo to continuous several photos. So if you are shooting kids running around, you would probably set your drive mode to continuous so that the camera takes lots of pictures while holding the shutter button down (the button that takes photos). Continuous mode is also great for flying birds or really any moving subject.
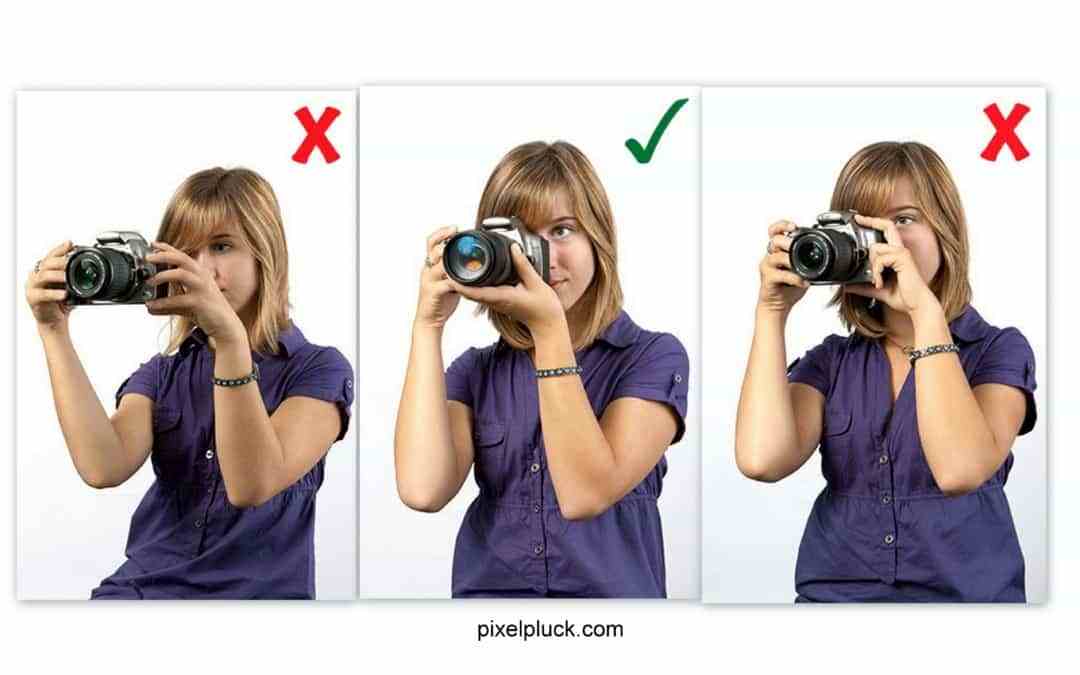
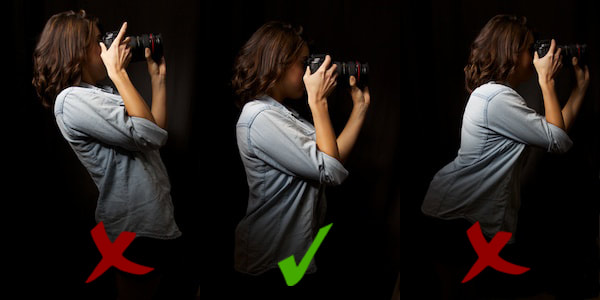
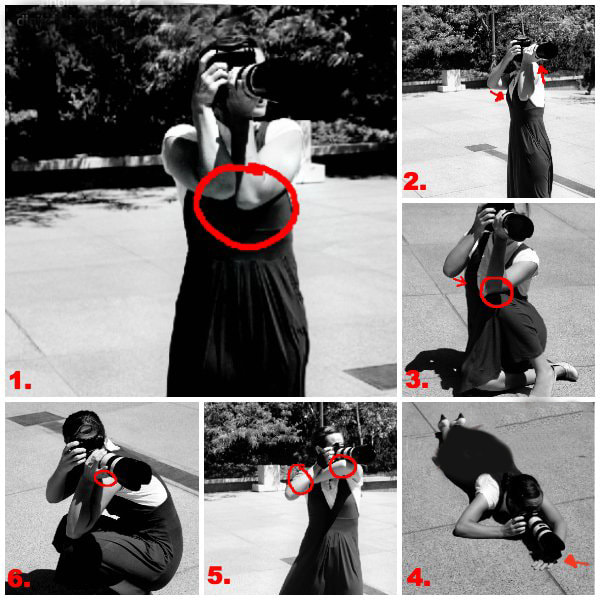
Stay tuned for the next lesson! Post any questions! If you would like 1 on 1 live online training click class registration at the top of this page. Lesson 1: The very basics to create professional photos. This may sound silly to some but most people do not know how to hold a medium to large sized camera correctly. This is important! Why? If you hold it like a pro, you are guaranteed to get less blurry photos. Especially when it's pretty dark in your environment or if you are zooming in far (you will find out why in a future lesson). Your left hand should be the main support of the camera by resting the lens in your left palm. The right hand is added support. Your left thumb and index and middle finger are for zooming in/out and manual focus. Next, let your elbows rest on your body for even more support. How frustrating would it be if you got an amazing shot only to find it is blurry when viewed on a larger screen like your laptop or monitor? Very! Here are example to hold a slr style camera the right way! If you ever want 1 on 1 training online, visit my class registration page here>>> https://www.crimsonleavesphotography.com/class-registration.html
SLR cameras have been affordable for awhile now, and they are still selling like crazy. There is a myth with these cameras though. People think they are going to get amazing pictures just because they own one. Not the case. You will get better color accuracy and better quality in low light but, that's about it if you keep it in automatic mode. The truth? It is you, the photographer! Taking hands-on beginner photography classes is all you need to start getting amazing shots more easily. I could buy the most expensive paint brush but, that won't make me a great painter, right? I would need to learn the skills and practice using them. When you go out and use learned photography skills, your perspective of everything you see will change. You will know how to position the subjects you are photographing several ways along with what mode to use to look like a professional. The best part? These beginner skills can be learned in one day. SLR cameras are very different than the regular point and shoot cameras because of detachable lenses, manual settings for shutter speed, aperture, and ISO. Knowing what these features are and how to adjust them alone allows more opportunities to get your amazing shot.
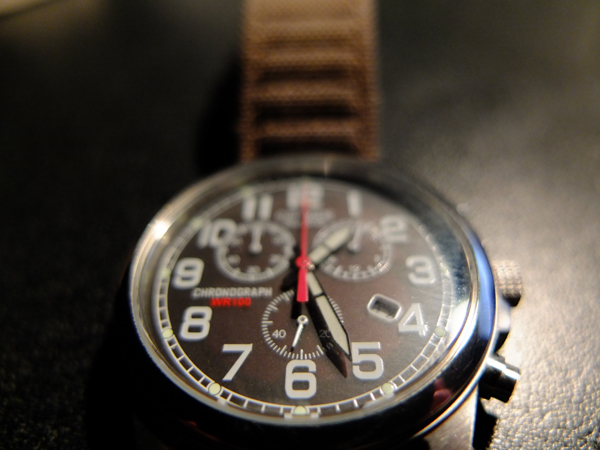
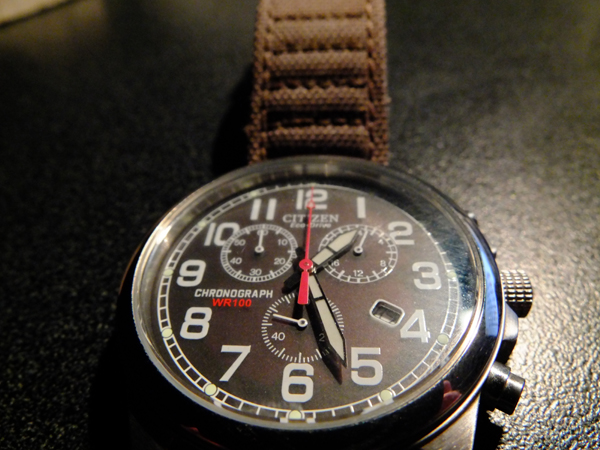
So what is the first step? Learning "composition", or how to arrange objects / subjects in your camera using different angles and heights to create an eye pleasing photograph. There is a guideline how to do this named the "rule of thirds" which I teach in-depth and hands-on in my 3 hour photo course. The quick summary of the rule of thirds is to place interesting subjects / objects one third from the outer edge of your viewfinder. Avoid putting your subjects in the center of your pictures. For example with a landscape shot, have the ground take up 2/3rds of the shot and the sky 1/3rd. Then try the opposite. Place the sun halfway between the center of the frame and the outer edge or vice versa. Rule of thirds works horizontally and vertically. I would say composition has a 75% importance factor while manual settings are 25%. You can get a great photo with composition alone but, it really helps to know the basics of both. The second step is planning and experimenting. Especially with landscapes and portraits. Knowing the best time of day or season to photograph is crucial. An hour after sunrise and an hour before sunset is considered the "golden hour". This is when the light looks warm and is low to the horizon which creates beautiful colors and shadows. Experiment by taking the same shot really high up or really low to the ground. Which looks better to you? Practice unique perspectives with every shot and I guarantee more amazing shots will be created sooner. Bonus tip. Use a tripod when there isn't much light. There is nothing worse than thinking you got a great shot and then when you see it on a large screen, it's blurry! In low light, your shutter speed will slow down unless you adjust it manually. This causes motion blur from holding the camera unsteadily. I hope this was helpful to all the aspiring photographers out there. Want free tips? Ask a question here. Interested in taking hands-on photography classes in Columbus, Ohio? Here is my photo class link: http://www.crimsonleavesphotography.com/learn-photography.html Enjoy this free guide I created: 9 Essential questions you need to ask a wedding photographer7/23/2016 I get this question quite often. There are two things you must do and two things you must have to get that dramatic professional blurred background look in photography. By the way, this look I am about to teach you has a name, It's called "bokeh". Why? I have know idea but, it doesn't matter anyway. So let's get to the meat of this post already! Here we go. What you need: (1) A decent size camera sensor. At least 1.7th of an inch or larger. So unfortunately, camera phones and tiny basic cameras aren't going to give good bokeh. Moving on... (2) Aperture mode. This allows you to adjust how much distance will be in focus between you, your subject, and the infinite horizon (shown in camera as f numbers). What you have to do: (1) You need to get as close as possible to the subject / person you are photographing. You can do this by walking closer (obviously) or zooming in. I always recommend zooming in to at least 3x zoom for a basic camera or 50mm for an SLR as opposed to walking in closer because of lens distortion (enlarged noses problem). (2) You need to switch to aperture mode and adjust the aperture to the lowest number available for your camera or lens. f/4 or lower. The lower the number, less will be in focus and more of the background will be blurred (more bokeh!). All SLR lenses and basic cameras have different aperture numbers. At this point you may be asking yourself, can I adjust aperture on my basic point & shoot camera? Answer: Depends on your camera. If you can't adjust it, there is one trick that may help. You need to create a darker environment. The less light there is, the lower the aperture number will go automatically. If it is too dark though, your shutter speed will drop too and cause motion blur. The entire shot will be blurry. Not good! Now go experiment with aperture numbers and have fun! The pic on the left is set to aperture f/2.0, the one the right f/5.6. Look at the watch band.
Join me on Thursday, June 30th at 615pm to 815pm for my new photography class! Now learn how to take professional outdoor portraits and beautiful landscape photos. Learn: Manual settings, lighting, creative angles, posing, creative composition, and much more! There are so many skills out there to create professional looking photos. There are also many different techniques depending on the style you want. There is a lighting technique I use with my external flash that creates amazing results for outdoor portraits and I am excited to share it! 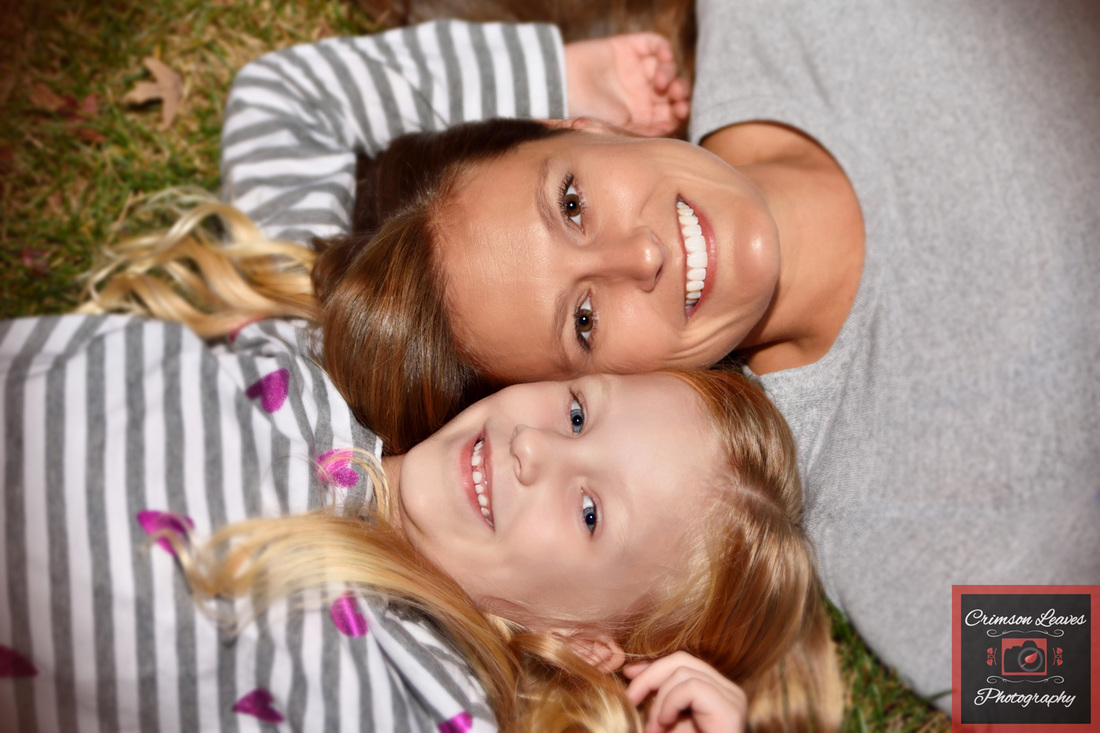 I am an International & National award-winning pro photographer who loves teaching others the art of photography. If you want to learn hands-on skills to bring your talent to the next level, this course is for you! The next class is at "Firefly American Bistro" 5525 New Albany Road West New Albany, Ohio 43054. Sunday, June 12 430p-830p Enjoy great food and have fun learning! Learn: Pro secrets and skills, manual controls, pro lighting for outdoor and indoor made easy, composition, white balance, aperture, iso, shutter speed, and much more! Register here: http://www.crimsonleavesphotography.com/class-registration.html 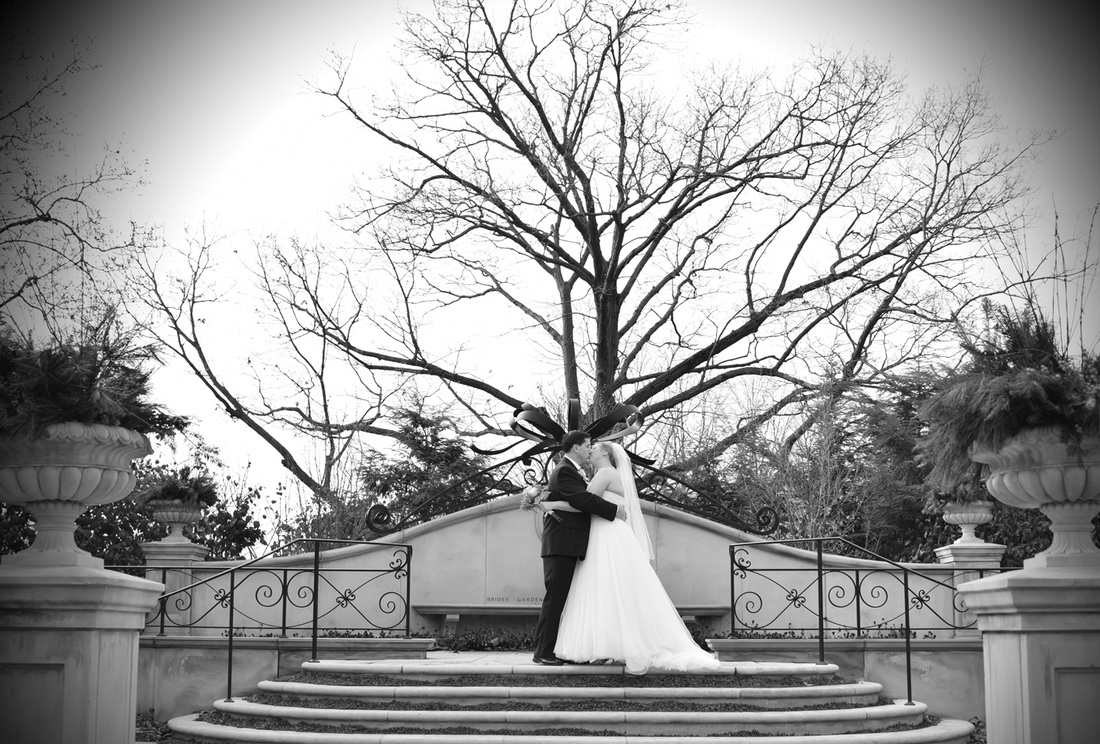 What a pleasure it was to work with the new owners of Rosa & Rocco's. I love doing product photography. Not only was all this food real, it tastes real good as well! This restaurant has great quality food with some amazing flavors. They offer Sunday brunch too which has something for everyone. I was honored to be a part of their marketing by creating these images for the new website
|
AuthorMatt Cangelosi - International Award-Winning Photographer - Columbus, Ohio Archives
October 2020
Categories |

 RSS Feed
